

こんにちは!Michaelです。
最近暑いですね。今日は東京は33度の予報です。真夏の気温ですね、もうこれは。
そんな中、今年は神奈川県全ての海水浴場が今夏全てクローズになったとニュースで見ました。千葉も相次いで開設中止が決まり、関東近郊の茨城などでも中止になるそうです。この状況で開けても東京方面からの人で混雑が予想され3密は避けられないからとのこと。
花火大会や大きな祭りも続々と中止が決まり、今年の夏はイベントが少なく、なんだか寂しくなりそうです。コロナが終息し、依然の日常に戻るにはまだまだ時間がかかりそうですね。
さて、今回から私の方では何度かに分けて、BloX応用編をお届けします。
1. BloXのおさらい
BloXは以前のブログ(BloX体験シリーズ)にも登場しているのでユーザーの間では馴染みのあるかたもいらっしゃるかもしれません。
■ BloX体験シリーズ
【Sisense BloX】BloX体験-1 : デフォルトテンプレートを使ってシンプルなインジケータを作ってみる
【Sisense BloX】BloX体験-2 : テンプレートを使ってSparklineインジケータを作ってみる
【Sisense BloX】BloX体験-3:ダッシュボードに新垣結衣出演のチキンラーメンの動画を組み込んでみる
おさらいすると、標準のインディケーターでは表現できないようなデザインを作れたり、ダッシュボード上に表示するフィルターを作ったり、また他のウェブページ(動画、写真なども含めて)を埋め込んだりと用途は多岐に渡ります。
フレキシビリティが高く、作りこむことにより、標準では表現できないUIを実現可能ですが、その分、JSONスタイルのコーディングメインで作っていくので、設定の仕方がやや取り掛かりにくい部分があります。加えて、日本語のドキュメントが非常に少ない!この状況を変えるべく、私の記事で少しでもBloXの良さに気づいてくれるユーザーが増えればと思っております。
さて、基本的は使い方は前回までのブログにて説明してあるので、この記事では応用的な使い方に焦点を当てていこうと思います。
今回はダッシュボード上に表示するフィルターをBloXを用いて、作成していきます。
ドロップダウンフィルターと日付選択フィルターの二つを作っていきます。
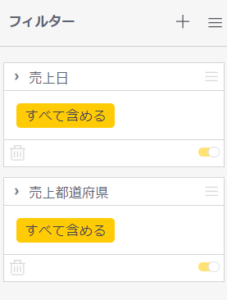
事前にダッシュボード右のフィルターパネルにフィルターを作成しておく必要があります。
今回は前回同様foodmartのデータを使いますが、期間指定ができるように「売上日」、売上のエリアが都道府県で選択できるように「売上都道府県」と2つ設置しました。
では、BloXウィジェットを作成して、編集していきましょう。
2. BloXでのドロップダウンフィルター
まずは、ドロップダウンで選択項目が表示され、そこから指定できるフィルターを設置します。
ウィジェットを新規作成し、左ペインのカテゴリにフィルターしたいディメンションを入力したい項目を入力します。今回は「売上都道府県」を選択。
前回のBloXに関するブログでもカバーされていますが、BloXエディター内に {Panel:〇〇〇} と左ペインのカテゴリや値に入れたフィールドの名前を〇〇〇のところに記述することでBloX内で表示させることができます。今回はそれと同様のやり方で、 {Choices:〇〇〇} と記述することにより、左ペインのカテゴリに入れたディメンションの値をドロップダウンに全て表示させます。
右ペインのBloX EditorのEditorとConfigurationにそれぞれ入力します。
Editorに実際のカラムの設置やアクションの設定などの記述を行い、ConfigurationにはBloXオブジェクトの見た目を整えます。
下のコードをコピーしてEditor, Configurationにそれぞれ張り付けましょう。あとは必要部分だけを変更するだけでOKです。
Editor
{
"style": "",
"script": "",
"title": "",
"titleStyle": [
{
"display": "none"
}
],
"showCarousel": true,
"carouselAnimation": {
"showButtons": false
},
"body": [
{
"type": "Container",
"separator": true,
"width": "90%",
"style": {
"margin": "0 auto"
},
"items": [
{
"spacing": "large",
"type": "TextBlock",
"text": "都道府県",
"weight": "light",
"color": "black"
},
{
"type": "Input.ChoiceSet",
"id": "data.filters[0].filterJaql.members[0]",
"class": "",
"displayType": "compact",
"choices": "{choices:売上都道府県}",
"value": "東京都",
"style": {
"width": "100%"
},
"borderRadius": "4px",
"borderStyle": "none",
"backgroundColor": "#F4F4F8"
},
{
"type": "ActionSet",
"actions": [
{
"type": "Filters",
"title": "Submit",
"data": {
"filters": [
{
"filterName": "売上都道府県",
"filterJaql": {
"explicit": false,
"members": [
""
]
}
}
]
}
}
]
}
]
}
]
}
重要なところを解説していきましょう。
"type": "Input.ChoiceSet",
ドロップダウンのインプットフィールドを示すものを指定します
"id": "data.filters[0].filterJaql.members[0]",
以下のアクションのパスを示します。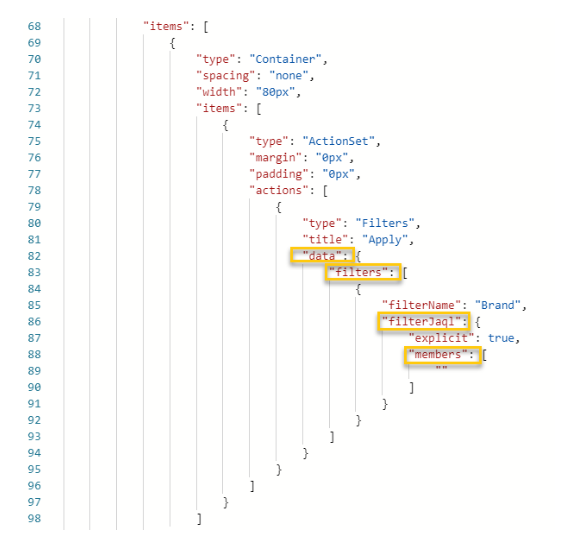
"choices": "{choices:売上都道府県}",
ドロップダウンに表示される項目を設定します。ウィジェット編集画面の左ペインの値がここに反映されます。
"value": "東京都",
デフォルト表示の値を指定します。
"filterName": "売上都道府県",
ダッシュボード右のフィルターパネルの該当するフィルター名をここに入力します。今回の場合は売上都道府県。
Configuration
{
"fontFamily": "Open Sans",
"fontSizes": {
"default": 16,
"small": 14,
"medium": 22,
"large": 32,
"extraLarge": 50
},
"fontWeights": {
"default": 400,
"light": 100,
"bold": 800
},
"containerStyles": {
"default": {
"backgroundColor": "#ffffff",
"foregroundColors": {
"default": {
"normal": "#3A4356"
},
"white": {
"normal": "#ffffff"
},
"grey": {
"normal": "#9EA2AB"
},
"orange": {
"normal": "#f2B900"
},
"yellow": {
"normal": "#ffcb05"
},
"black": {
"normal": "#000000"
},
"lightGreen": {
"normal": "#93c0c0"
},
"green": {
"normal": "#2BCC7F"
},
"red": {
"normal": "#FA5656"
},
"accent": {
"normal": "#2E89FC"
},
"good": {
"normal": "#54a254"
},
"warning": {
"normal": "#e69500"
},
"attention": {
"normal": "#cc3300"
}
}
}
},
"imageSizes": {
"default": 40,
"small": 40,
"medium": 80,
"large": 120
},
"imageSet": {
"imageSize": "medium",
"maxImageHeight": 100
},
"actions": {
"color": "#fff",
"backgroundColor": "#136DB6",
"maxActions": 5,
"spacing": "large",
"buttonSpacing": 20,
"actionsOrientation": "horizontal",
"actionAlignment": "right",
"margin": "0",
"showCard": {
"actionMode": "inline",
"inlineTopMargin": 16,
"style": "default"
}
},
"spacing": {
"default": 5,
"small": 5,
"medium": 10,
"large": 20,
"extraLarge": 40,
"padding": 0
},
"separator": {
"lineThickness": 1,
"lineColor": "#D8D8D8"
},
"factSet": {
"title": {
"size": "default",
"color": "default",
"weight": "bold",
"warp": true
},
"value": {
"size": "default",
"color": "default",
"weight": "default",
"warp": true
},
"spacing": 20
},
"supportsInteractivity": true,
"imageBaseUrl": "",
"height": 197
}
"actions": {
"color": "#fff",
"backgroundColor": "#136DB6",
・
・
・
アクションのSubmitボタンの背景の色をこのbackgroundColorで青に変えています。
適用ボタンを押し、ダッシュボードに戻ります。
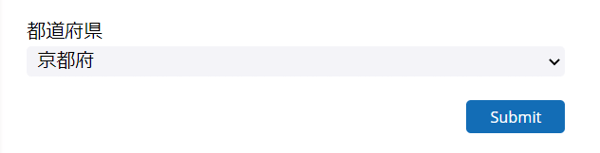
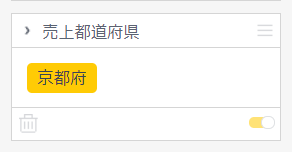
できました!
値をこの中から「京都府」を選択すると、右のダッシュボードフィルターの値が変わり、ダッシュボード全体もフィルターが効き、表示も変わりますね。
次は、期間指定フィルターを実装していきましょう。
3. BloXでの期間指定フィルター
新しくBloXウィジェットを作成し、ドロップダウンの時と同様に左ペインのカテゴリにdate形式のデータを入れます。ここでは「売上日」を入れました。
以下のコードをEditor, Configurationにそれぞれペーストします。
Editor
{
"style": "",
"script": "",
"title": "",
"titleStyle": [
{
"display": "none"
}
],
"showCarousel": true,
"carouselAnimation": {
"showButtons": false
},
"body": [
{
"type": "Container",
"width": "90%",
"style": {
"margin": "0 auto"
},
"items": [
{
"spacing": "large",
"type": "TextBlock",
"text": "From Date",
"weight": "light",
"color": "black"
},
{
"type": "Input.Date",
"id": "data.filters[0].filterJaql.from",
"placeholder": "yyyy-mm-dd",
"defaultValue": "data.filters[0].filterJaql.from",
"style": {
"width": "100%"
},
"borderRadius": "4px",
"borderStyle": "none",
"backgroundColor": "#F4F4F8"
},
{
"spacing": "medium",
"type": "TextBlock",
"text": "To Date",
"weight": "light",
"color": "black"
},
{
"type": "Input.Date",
"id": "data.filters[0].filterJaql.to",
"placeholder": "yyyy-mm-dd",
"defaultValue": "data.filters[0].filterJaql.to",
"style": {
"width": "100%"
},
"borderRadius": "4px",
"borderStyle": "none",
"backgroundColor": "#F4F4F8"
},
{
"type": "ActionSet",
"actions": [
{
"type": "Filters",
"title": "Submit",
"data": {
"filters": [
{
"filterName": "売上日",
"filterJaql": {
"from": "",
"to": "",
"custom": false
}
}
]
}
}
]
}
]
}
]
}
"type": "Input.Date",
Dateを入力できるtypeを指定
"id": "data.filters[0].filterJaql.from",
dropdownの時の同様にここはActionのパスを指定しています
"placeholder": "yyyy-mm-dd",
入力形式を指定します
"filterName": "売上日",
ダッシュボード右のフィルターパネルの該当フィルター名を指定します。
Configuration
{
    "fontFamily": "Open Sans",
    "fontSizes": {
        "default": 16,
        "small": 14,
        "medium": 22,
        "large": 32,
        "extraLarge": 50
    },
    "fontWeights": {
        "default": 400,
        "light": 100,
        "bold": 800
    },
    "containerStyles": {
        "default": {
            "backgroundColor": "#ffffff",
            "foregroundColors": {
                "default": {
                    "normal": "#3A4356"
                },
                "white": {
                    "normal": "#ffffff"
                },
                "grey": {
                    "normal": "#9EA2AB"
                },
                "orange": {
                    "normal": "#f2B900"
                },
                "yellow": {
                    "normal": "#ffcb05"
                },
                "black": {
                    "normal": "#000000"
                },
                "lightGreen": {
                    "normal": "#93c0c0"
                },
                "green": {
                    "normal": "#2BCC7F"
                },
                "red": {
                    "normal": "#FA5656"
                },
                "accent": {
                    "normal": "#2E89FC"
                },
                "good": {
                    "normal": "#54a254"
                },
                "warning": {
                    "normal": "#e69500"
                },
                "attention": {
                    "normal": "#cc3300"
                }
            }
        }
    },
    "imageSizes": {
        "default": 40,
        "small": 40,
        "medium": 80,
        "large": 120
    },
    "imageSet": {
        "imageSize": "medium",
        "maxImageHeight": 100
    },
    "actions": {
        "color": "#fff",
        "backgroundColor": "#136DB6",
        "maxActions": 5,
        "spacing": "large",
        "buttonSpacing": 20,
        "actionsOrientation": "horizontal",
        "actionAlignment": "right",
        "margin": "0",
        "showCard": {
            "actionMode": "inline",
            "inlineTopMargin": 16,
            "style": "default"
        }
    },
    "spacing": {
        "default": 5,
        "small": 5,
        "medium": 10,
        "large": 20,
        "extraLarge": 40,
        "padding": 0
    },
    "separator": {
        "lineThickness": 1,
        "lineColor": "#D8D8D8"
    },
    "factSet": {
        "title": {
            "size": "default",
            "color": "default",
            "weight": "bold",
            "warp": true
        },
        "value": {
            "size": "default",
            "color": "default",
            "weight": "default",
            "warp": true
        },
        "spacing": 20
    },
    "supportsInteractivity": true,
    "imageBaseUrl": "",
    "height": 197
}
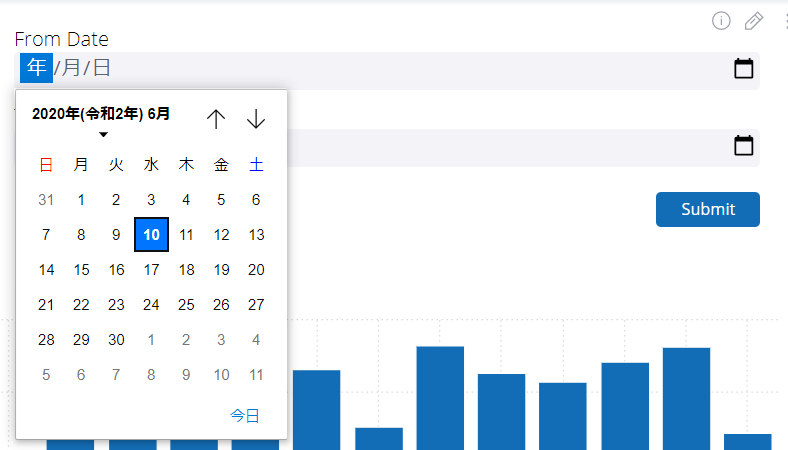
確認してみましょう。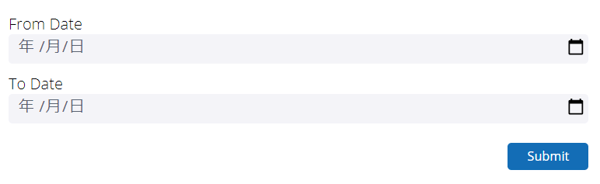
Date Pickerアイコンをクリックすると、Date Pickerで選択もできます。

任意に期間指定して、Submitボタンを押すと、ダッシュボードフィルターがそれと連動して期間指定されてダッシュボードに結果が反映されます。

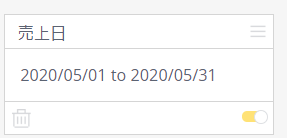
二つ合わせて完成したものがこちら!
※録画環境によりドロップダウンのアニメーションとDate Pickerが表示されていませんが、実際には表示されます。
4. まとめ
今回はBloXの応用編ということでBloXを使ったフィルターを作成しました。この他にもオシャレなインディケーターが作れたり、ウェブページの内容や画像・動画を表示させたりと、BloXを使ってダッシュボードのUIをさらに磨きをかけることができますね。
またの機会に、その他のBloXウィジェットの作成方法も紹介できればと思います。
それでは、Viva, Sisense!
Sisenseを体験してみませんか?
INSIGHT LABではSisense紹介セミナーを定期開催しています。Sisenseの製品紹介や他BI製品との比較だけでなく、デモンストレーションを通してSisenseのシンプルな操作性やプレゼンテーション機能を体感いただけます。